

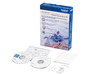
Also Includes

INCLUDED: Brother Instructional Tutorial DVD Video, PE-Design Next 9.0 Software
INCLUDED: Penny Muncaster Jewell Practical Guide 470Pg Book & CD to Brother PE Design 9 NEXT

INCLUDED: Brother SAPEDDVD Carol Price 2 Tutorial DVDs for PEDesign NEXT Software


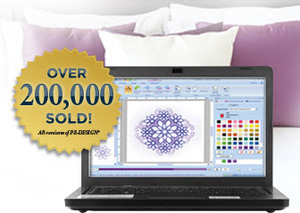
Over 200,000 Sold by Brother! Digitize Images, Photos, Cross Stitch, Candlewicking, Stem Stitch, Editing, Sizing, Name Drop, 100 Fonts with Keyboard Lettering, 2 Monograms Fonts, 200 Lettering and Design Templates, Import Vector Images, Split Designs for 12x12 or 14x14" Hoops, Jump Stitch Settings for PR's, Link up to 4 PR650C and PR1000 machines,

Design 14x14" Jacket Backs for PR1000 PR1000E, Multiple Name Drop Inserts Personalization, Digitize Any Image or Photo, 1 Computer for up to 4 Machines, 100 Fonts, 200 Business Templates
Click HERE for Brother PE Design Next Videos on You Tube
PE-Design® NEXT software takes digitizing and embroidery to the next level of creativity with exceptional new and enhanced features.
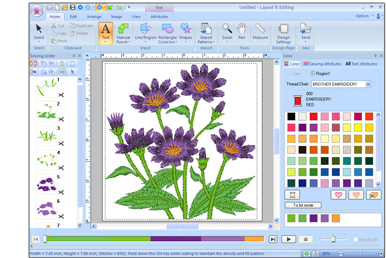
A user-friendly graphical interface, similar to many software programs on the market today, makes it easy to locate and select the dynamic functions of this software.
In addition, the quick access toolbar allows you to customize your favorite operations so they are only a quick click away.

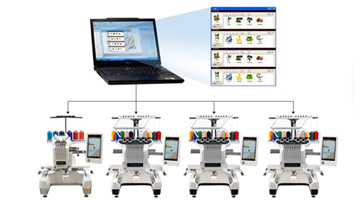
Several “Start Your Own Business” functions have been added, such as the new PE-Design® NEXT Link Function that allows up to four PR-1000 and upgraded PR-650 machines to be linked from a single computer with queue functionality. This is perfect for the small business owner who wants the ability to queue up to 100 designs at one time.
Other time savers are the lettering and design template feature, which provide the ability to create perfectly sized logos with lettering and designs, and the new Name Drop Template Feature that can be used to create different names with the same design and layout.

Step into the Next Dimension in digitizing software with these new and enhanced features of PE-Design® NEXT:
- New Easy-to-Use Graphical Interface
- Customized Quick Access Toolbar / Customized Shortcut Keys
- PE-Design® NEXT Link – Link up to 4 PR-1000 or Upgraded PR-650 Machines with Queue Functionality
- 100 Built-in Fonts with On-Screen Typing Capability
- Outline Sewing for Select Built-in Fonts
- Convert Pre-digitized Text to Block for Customizing Lettering Shapes or Stitches Angles
- Connection Point Setting Provides the Ability to Change Jump Stitches for Lettering
- Editing Capabilities in 3D Image Mode/Realistic Preview
- Stitch Simulator in the User Interface
- *200 Start Your Own Business Lettering and Design Templates
- Pan Tool
- Name Drop Function for Merging Names into Design Templates
- Candlewicking Stitch and Stem Stitch
- Create Spiral Floral Patterns
- Circle Copy and Mirror Copy
- Create Offset Lines for Decorative Effects such as Echo Quilting
- Import Vector Images (WMF)
- Offset Attribute for Motif Stitch Patterns
- Default Size Setting for Motif Stitch Patterns and Programmed Fill Stitch
- Create Embossing and Engraving Effects with Outlines and Shapes
- Create Split Embroidery Designs for Jumbo Frames with PR-1000
- Jump Stitch Thread Trimming Setting for PR Series Machines
- Decorative Patterns
- 2 Monogram Fonts
Included:
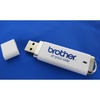
- USB Card Writer Module
- CD-Rom (including PED Next Program, Instructions, and Tutorials)
- Memory Card
- Installation Guide
- Instruction Manual
Top 15 Features
Top 15 PR Customer
1. New Easy-to-Use Graphical Interface
2. Link interface with PR650C & PR1000 machines
3. Name Drop Feature – for merging names into an embroidery pattern
4. 200 lettering and design templates
5. 100 built in fonts with text preview & 2 monogram fonts
6.New Splitting Extra-Large Designs for use with PR-1000 Jumbo Hoop
7. Edit designs and text in Realistic Preview Mode (3D mode) in Layout and Editing
8. Outline sewing for select built in fonts
9. Create floral patterns (Spiral decorative circle)
10. Built in Stem Stitch and Candlewicking stitch
11. Mirror & Circle Copy
12. Offset lines to create exact echo quilting
13. Import Vector Files (WMF)
14. Thread Trim functionality for PR machines
15. Type text directly on screen
Top 15 Home Market Customers
1. New Easy-to-Use Graphical Interface
2. Edit designs and text in Realistic Preview Mode (3D mode) in Layout
and Editing
3. Create floral patterns (Spiral decorative circle)
4. Built in Stem Stitch and Candlewicking stitch
5. Automatic Outline and Editing Capabilities for Built in Fonts
6. 100 built in fonts with text preview & 2 monogram fonts
7. Type text directly on screen
8. Font Preview
9. Offset lines to create exact echo quilting
10. Mirror & Circle Copy
11. Easy Pattern Duplication function
12. Emboss & Engrave from lines and built in shapes
13. Docked Sewing Order Window
14. Easily match colors from most recently selected
15. Text Editing tools for Transformed Text
Queue up to 100 designs at one time, create perfectly sized logos with lettering and designs, Name Drop create different names with the same design and layout.
Angela Wolf tests Brother's PE-Design Next
See All Brother PE Design Next Videos on You Tube
Click Here for Software Update 9.30 PE-DESIGN NEXT(
- US Warranty 30 days replacement if defective.
- Non-US Warranty: 30 days parts and labor
Click HERE for 12 You Tube Videos by Cindy Hogan on Brother PE Design Next Embroidery Digitizing Software
*There is a new update to PE-DESIGN ®NEXT (Palette® 9) to version 9.22 To update your software, connect to the internet and open Layout and Editing. At the top right of the screen, there is an icon that looks like a Man . Click on the arrow beside the help icon and select Check for Updates. The software will check to see if you are running the most current version. Please note that if you did not update to 9.02 or 9.10, or 9.13 you may have to run the update twice.
**Click HERE for Latest PE Design Next version Download
Minimum PC Requirements
- Computer: IBM PC or compatible computer
- Operating System: Windows® XP/ Windows® Vista/ Windows® 7 (32 or 64 bit)
- Processor: 1GHz or higher
- Memory: 512MB (1GB or more is recommended)
- Hard disk free space: 300MB
- Monitor: XGA (1024 x 768), 16-bit color or higher
- Port: 1 available USB
- CD-ROM drive: Required for installation
* CD-Rom (including PED Next Program, Instructions, and Tutorials)
* Memory Card
* Installation Guide
* Instruction Manual
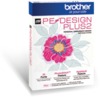
 PE-DESIGN® SOFTWARE
BRINGS EMBROIDERY TO A
WHOLE NEW DIMENSION
PE-DESIGN® NEXT Software offers full-featured digitizing and editing capabilities, and is designed for experienced hobbyists and home business entrepreneurs.
PE-DESIGN® SOFTWARE
BRINGS EMBROIDERY TO A
WHOLE NEW DIMENSION
PE-DESIGN® NEXT Software offers full-featured digitizing and editing capabilities, and is designed for experienced hobbyists and home business entrepreneurs.
 Click HERE for PE Design Next Trial Version in English and 7 Languages
This is a trial version of PE-DESIGN NEXT which allows you to try PE-DESIGN NEXT (Personal Embroidery Design Software System) with limited functions.
Brother is not responsible for damage to or loss of any equipment, media, programs or data related to the use of this trial version.
If a product version of PE-DESIGN NEXT has already been installed on your PC, do not install this trial version.
If you purchase a product version of PE-DESIGN NEXT and install it after using this trial version, be sure to uninstall this trial version by using "Control Panel" - "Add/Remove programs".
In order to install the software on Windows® Operating System, you must log on to the computer using an account with administrator privileges.
Click HERE for PE Design Next Trial Version in English and 7 Languages
This is a trial version of PE-DESIGN NEXT which allows you to try PE-DESIGN NEXT (Personal Embroidery Design Software System) with limited functions.
Brother is not responsible for damage to or loss of any equipment, media, programs or data related to the use of this trial version.
If a product version of PE-DESIGN NEXT has already been installed on your PC, do not install this trial version.
If you purchase a product version of PE-DESIGN NEXT and install it after using this trial version, be sure to uninstall this trial version by using "Control Panel" - "Add/Remove programs".
In order to install the software on Windows® Operating System, you must log on to the computer using an account with administrator privileges.
Did you know that in PE-DESIGN® NEXT, you have the ability to customize keyboard shortcuts? For this example, lets create a keyboard shortcut for turning on and off the Grid function. CynthiasEmbroidery.com
1. Click on the Down arrow next to the Quick Access toolbar and then choose More Commands.
2. At the bottom of the Commands window, click on the Customize Keyboard shortcuts button.
3. In the Categories window, select View.
4. In the Commands window, select Show Grid.
5. Click inside the Press new shortcut key box, and then Press the Alt key and the G key on the keyboard. If the shortcut has not been assigned to anything else, it will say Unassigned. If it is an existing shortcut, you will need to select a different keystroke combination. In PE-DESIGN lettering, you do not have to add a keystroke with a letter. The letter may be assigned by itself. However, to make both programs the same, use the same shortcut combination
6. Press the Assign button.
7. You may now click Close and OK in where appropriate.
Sign up for email to see video outlining these instructions.
Would a larger computer moniter up to 27" keep icons from overlapping? Betsy Boop
Hi Besty,
I don’t know if a larger screen will help you or not. I use a 14 inch laptop monitor and do not have any issues. Have you accidentally undocked your items from their locations? I always leave mine docked that way they don’t sit on top of any items and I can get to them easily. If you have updated to the most current version of the software (9.22), you can go to the File pull down menu and choose Options. Click on the Application Color tab on the left side and then choose Reset Pane Position. Once you do that, click OK. Close the software and reopen it, the items will be re-docked in their original location. Alternately, there is a lesson my workbook that shows you exactly how to re-dock the items as well as a video tutorial on the CD.
If you like things large, then you may like a larger monitor. I have found that when increasing the size of my monitor, my display just stretches to fill that screen. You will have to play with the resolution of the display to see if that helps. You can try this on your computer monitor that you have now. Click on the Control Panel from the start menu, choose Appearance and Personalization and then choose Adjust the Screen Resolution. It may be that you have the resolution set too high or you have adjusted the Text and icons to make them larger to make them easier to see and therefore have less monitor space to work with.
Cindy Hogan, www.cynthiasembroidery.com

Recommended Accessories

Brother SAVRPED10 PEDesign to v10 Embroidery Software Upgrade Only from v5-9.0

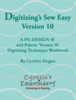
Digitizing's Sew Easy Version 10 Book for Brother PEDesign 10 Software by Cindy Hogan
Other Items You May Be Interested In
-
Brother SAVRPED10 PEDesign ECS10 Babylock Palette to V10 Embroidery Software Upgrade from v5 to v9 Next w/ Digitizing, Patch, Applique, Cutwork Wizard
Free Ground Shipping to the Contiguous USA -
Brother PE-DESIGN10 PE Design Palette Full Version v10 Embroidery Digitizing Software with Patch, Applique, Cutwork Wizard (See Trial Version*)
$999.99 Free Ground Shipping to the Contiguous USA
